Showing posts with label pretty paper. Show all posts

Thursday, May 30, 2013

Tutorial Thursday: DIY Washi Paper Tape Bows

Washi tape. It's this paper tape.. kind of like masking tape or painter's tape. You can stick it on practically anything, it seems! I had no idea what it was, let alone what to do with it when I first heard about it. Why on earth would anybody go nuts over some tape, no matter how pretty it was? Horrible thoughts of sticky, gooey messes and hours spent with bottles of Goo Gone made the tapes unappealing. 

And then.. yes.. wait for it.. 

 Then I had a lightbulb moment when I had nothing nearby but had to mark where a roll of packing tape ended. Out rolled the washi tape I had owned for the longest time, but hadn't touched. RIIIPPP! went the tape and I stuck it onto the end of the packing tape. I was astounded at how easily the washi tape disentangled itself from the packing tape with no sticky residue (or any trace, for that matter). I was sold!

There appears to be a bazillion and one ways to use the thing.. from decorating thumbtacks to making over keyboards, broken ipads or room walls. The MT tape site is pure visual overload for me (seeing that I can't read Japanese, but that's no hinderance to appreciating the site!). You can even use the tape on your keyboard to teach someone how to play! It's all here in the MT Casa Gallery.

In the midst of all this clicking, I came across these DIY bows. It was one of the more original tutorials and my interest was piqued. 


Seemed simple enough, so I gave it a go. They turned out exactly the way they were supposed to but I didn't really like the bit in the middle. Seemed too fat and wide in relation to the rest of the bow so I made my own modifications.

Here's what you need:


Scissors, some washi tape and a something to decorate!


So I started by measuring the lengths I needed.
I roughly guessed it to be1.5x the width of my present.


Then I cut a 2nd strip that was about half that length.
This shorter piece is what you use to make your ribbon tails.


So I started folding my long piece of tape length-wise..
You can follow the tutorial and fold the tape onto itself across too.
All that matters is that at the end of it all, both sides of the strip of tape aren't sticky.
If you choose to fold the tape transversely, don't forget that you'll need double the tape length!


So anyway, I take my non-sticky strip of washi tape and loop it around to form a circle


I cut a thinner piece of washi tape (just cut one strip down the middle to get 2 thin strips)


This thinner short strip of washi tape is used to tape the ends of the loop together.
Instead of wrapping it all the way around, I left a bit of a tail.. You'll see why soon!
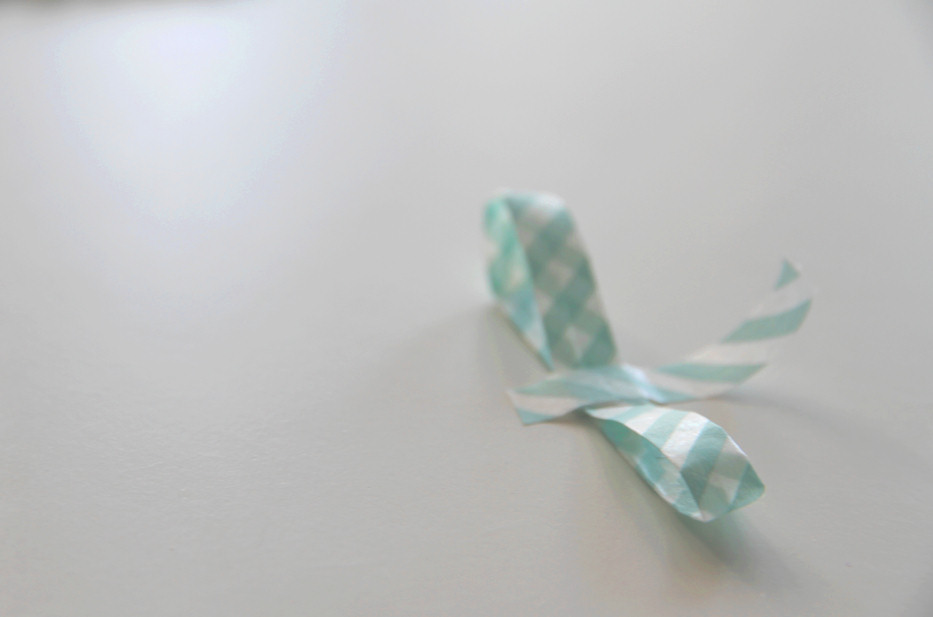

This is the fun part.. you sit the loop up like a wheel about to be rolled and then you squish it!
This is where I use the bit of extra tail and wrap it around the squished loop to form 2 loops of the bow.


This is where I made another modification to the tutorial.
I didn't like how uniformly squat the middle of the bow was, so I made 2 transverse snips in middle of the shorter piece from the beginning of the tutorial (make sure you don't accidentally cut all the way across and join up the 2 snips!). Then I folded the corners in to make a "waist" for the tape.


I found it easier to wrap the thin, middle piece of washi tape around both loop and ribbon tail piece when the tail piece had a "waist" to wrap around.

Now, all that's left is to fluff up the loops of your bow and trim the tips of the tails and you've got a bow! The middle bit between the 2 loops are a tad naked, so it's a free-for-all when it comes to deciding what fills up that space. I made a mini-loop and stuck it on with double sided tape (seen in 1st picture of this post). You could attach a flower bud, rhinestones, bells or other embellishments as you please :)


Tips and hints

  • I prefer a narrower middle section between the two bow loops so I trimmed the little strip to a smaller width before wrapping it around. This one's just a personal preference.
  • To cut a perfectly symmetrical "V" at the ends of the ribbon tails, pinch the ends together (sticky side facing out) and snip off the corner starting about 1cm before the end of the tape at the folded side and heading towards the end of the tape to the open side
  • Take your time and have fun experimenting with the different lengths of the tape! The 3 lengths are only a reference because really, doesn't it depend on how big a bow you want to make in the end? No point having a teeny 2cm bow on  a big happy gift hamper..!


Thursday, May 16, 2013

Tutorial Thursday: Origami Crane Hanging Crystal Clips

Paper cranes are generally associated with good luck, hope, happiness and peace, especially amongst the Japanese. Some people believe that folding a thousand cranes will result in a wish being fulfilled, as an ancient legend describes. There are various rules and stipulations to the folklore. Some say that the 1,000 cranes must be completed within a year and the wish-maker must keep all folded cranes for their wish to come true.

Regardless of ancient legends and symbolism, a paper crane is something I find very elegant, serene and beautiful. It's also quite therapeutic trying to fold a ton of them! For our wedding, I had no lofty ambition of folding a thousand paper cranes by hand. I wish I could have.. it would have been sweet, but it just wasn't practical with our timeframe. Instead, I made one crane for every guest invited regardless of whether they could attend or not.

The crane clips were inspired by hanging mobiles and sun catchers. They were also the perfect excuse for me to buy Swarovski crystal beads ;) We used the clips as our guestbook, and got our friends and family to scribble messages on the back of their photobooth photos and clip them on our Wishing Tree. We were lucky enough to have a beautiful live, leafy tree in the middle of our reception area courtyard and everyone had fun picking out their favorite crane to hang their well-wishes on! We still have them hanging on our wooden toy tree at home and it always brings a smile to see the photos and read the messages :)

I think these would work well not only at weddings, but at other parties too - engagements, baby showers, children's birthdays etc. They are quite fiddly to make, but look quite spectacular, especially on tree branches.


(Above 3 photos by Milk & Honey Photography)


You will need:


  • Origami paper (or any squared piece of paper) to make your cranes
    • There are again, a zillion websites teaching you how to fold an origami crane, so I won't bore you with those details. Personally, I learnt a lot faster with someone folding one right in front of me and less cranes got mauled at the end of it.
    • You don't need to use origami paper. I used old music sheets, maps, sheets of Japanese rice paper from the local art store, vellum paper.. obviously, the thicker the paper, the harder it will be to fold!
  • String, twine, jute or fishing wire - just something to hang your cranes with
  • Needle - No, not Arya Stark's sword. A sewing needle. You will need one with a big enough eyelet to pass your string through. 
  • Beads - Any bead with holes big enough for your needle to pass through will do. I adore Swarovski crystals because of how clear and shiny they are, but this is where you let your creativity loose. String up one bead, or a few!
  • Mini clothespegs - I used the 25mm ones but any size will do. The important part is the diameter of the metal spring's hole. That needs to be wide enough for your string to pass.


What to do:

Cut a piece of string to 1.5x the length you'd like your finished crane clip to be. I'm not very fond of math, so I eyeball it but essentially, you just want a bit of extra string so you have an easier time tying all the knots. If you have no idea, try starting with 60cm piece of string - it would be plenty long for everything and you could adjust the lengths of subsequent clips once you get the feel.

Make a loop at one end and tie.


Thread the other end of the string through your needle. This is the fiddly part and I learnt the hard way that no amount of shoving is gonna get thick burlap twine through that needle eyelet so I had to find something thinner :(


If you wanted, you could thread your bead(s) at this stage and knot the string just below the beads if you wanted some beads above your crane. 

If not, poke your needle through the top of your fluffed-up paper crane smack in the middle of its "body" and pull your string through the ready-made gap on the other side.


You can choose to make a knot just below where you want the crane to sit at this stage, or do all your knots at once in the end.

Next, thread your string through your bead(s) and pull through. You will need to make a knot below the bead at some stage unless you want it to just fall onto your wooden peg and sit there.


Almost there! 
Thread your string through the side of the wooden peg through the hole in the metal spring. Tie it up, snip off the extra string and your crane clip is ready to hang up!


TADA!


Tips and hints:

  • To maintain some distance between beads, I tied a knot under each one. I used the same trick to keep my crane sitting off the bead.
  • Thinner paper is MUCH easier to fold, but also MUCH easier to rip, especially when puffing up the cranes and spreading the wings! Be careful!
  • There are two ways to fold cranes - I personally prefer the one where the wings cannot flap because I think it looks a bit more refined and elegant. If you skip steps 14 and 15 in the link just mentioned, you'll get the more triangular-looking cranes with flappable wings when you hold tight to the head and pull the tail.
  • Don't worry about the lengths and the size of the loops! It makes things less visually boring when all the crane clips are hung up.
  • Don't worry about your string being crinkly - the weight of whatever you're clipping will straighten it out.

Thursday, May 02, 2013

Tutorial Thursday: Tissue Paper Pompoms

It's Spring and all things bright, happy, fresh and pretty for one half of the world (and yes, I'm envious but our turn will come soon!), but it's Autumn and we've had a shocking run of weather ups and downs in the past month or so. I feel like a plant nowadays, gravitating towards any spot of gloriously warm pool of sunshine in our apartment. So! To cheer things up, I wanted to share our tissue paper pompoms that I made for our wedding.

There are a TON of these tutorials (just google "how to make tissue paper pom poms" and you'll get "About 380,000 results"), so I'm not going to re-invent the wheel. The bulk of them are based on Martha Stewart's tutorial, which I also worked off. The Polkadot Bride has a clear, concise tutorial that I also liked. I just wanted to share a few tips and modifiications I made get these pretty, cheery little lovelies!


Image to tweet tissue paper pompom post


So what you'll need are:
  • Tissue Paper - this is where I had a field day and ordered a stack of them from eBay, some of which had flecks of glitter and metallic bits to make things more interesting
  • String - Instead of the floral wire (which I don't have lying around the home), I used twine to tie everything up. A stapler is another alternative, but you'll need a heavy duty one that can staple a hefty stack of tissue paper.
  • More string - This is for hanging up your fluffy tissue pompoms, but I used fishing line so they would appear to be "floating" rather than hanging.

Other modifications I made:
  • Increasing the tissue stack from the suggested 8 sheets to a minimum of 12 and up to 20. The more, the merrier! The extra layers just make your pompom "fuller" when you fluff it all out. I tried one with 8 sheets and it looked a bit sad and malnourished :(
  • Snipping away triangles instead of scallops after folding all the sheets accordion-style to get spiky pompoms. It really doesn't have to be perfect because it doesn't really show up (unless you've lopped off whole triangles or something spectacular).
Hanging paper pompom image


After all of that, I ended up with oodles of 'em! Practice makes perfect, they say.. and each one got easier to make. 
Blue and gold tissue paper scraps with scissors

The trickiest part was fluffing the pompoms. I found that it was easier to start from one side and work through roughly half the layers, flip the funny looking half-sphere of tissue over and start fluffing the other side. You can adjust the overall shape at the end of it all, so don't be too worried if your pompom looks lopsided like I was when I first did it.

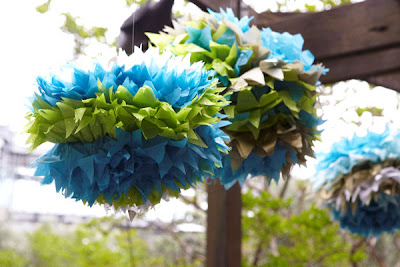
If all goes well, you'll have yourself some of these to liven up your corner of the world!


Aerial image of completed pompoms

Image of Tiffany blue and gold tissue pompoms completed
Pin It button on image hover